Browsed by
Category: Programming

Python Argparse: Group Sub-Parsers

Python Argparse: Group Sub-Parsers

Python argparse has become a staple package in python in part due to its ease of use.

However, I recently came across an issue while using it on InsteonMQTT which makes extensive use of sub-parsers. Other than sorting, there is no mechanism to organize sub-parser objects to make them more readable.

This seems like a known issue going back to at least 2009 with no indication that it will be solved. Luckily, Steven Bethard was nice enough to propose a patch for argparse that I was able to convert to a module extension very easily.

In short, the following is the module extension argparse_ext.py:

#===========================================================================
#
# Extend Argparse to Enable Sub-Parser Groups
#
# Based on this very old issue: https://bugs.python.org/issue9341
#
# Adds the method `add_parser_group()` to the sub-parser class.
# This adds a group heading to the sub-parser list, just like the
# `add_argument_group()` method.
#
# NOTE: As noted on the issue page, this probably won't work with [parents].
# see http://bugs.python.org/issue16807
#
#===========================================================================
# Pylint doesn't like us access protected items like this
#pylint:disable=protected-access,abstract-method
import argparse


class _SubParsersAction(argparse._SubParsersAction):

    class _PseudoGroup(argparse.Action):

        def __init__(self, container, title):
            sup = super(_SubParsersAction._PseudoGroup, self)
            sup.__init__(option_strings=[], dest=title)
            self.container = container
            self._choices_actions = []

        def add_parser(self, name, **kwargs):
            # add the parser to the main Action, but move the pseudo action
            # in the group's own list
            parser = self.container.add_parser(name, **kwargs)
            choice_action = self.container._choices_actions.pop()
            self._choices_actions.append(choice_action)
            return parser

        def _get_subactions(self):
            return self._choices_actions

        def add_parser_group(self, title):
            # the formatter can handle recursive subgroups
            grp = _SubParsersAction._PseudoGroup(self, title)
            self._choices_actions.append(grp)
            return grp

    def add_parser_group(self, title):
        #
        grp = _SubParsersAction._PseudoGroup(self, title)
        self._choices_actions.append(grp)
        return grp


class ArgumentParser(argparse.ArgumentParser):
    def __init__(self, *args, **kwargs):
        super().__init__(*args, **kwargs)
        self.register('action', 'parsers', _SubParsersAction)

And the following is a simple test file test.py:

import argparse_ext


parser = argparse_ext.ArgumentParser(prog='PROG')
cmd = parser.add_subparsers(dest='cmd')
grp1 = cmd.add_parser_group('group1:')
grp1.add_parser('a', help='a subcommand help', aliases=['a1','a2'])
grp1.add_parser('b', help='b subcommand help')
grp1.add_parser('c', help='c subcommand help')
grp2 = cmd.add_parser_group('group2:')
grp2.add_parser('d', help='d subcommand help')
grp2.add_parser('e', help='e subcommand help', aliases=['e1'])

parser.print_help()

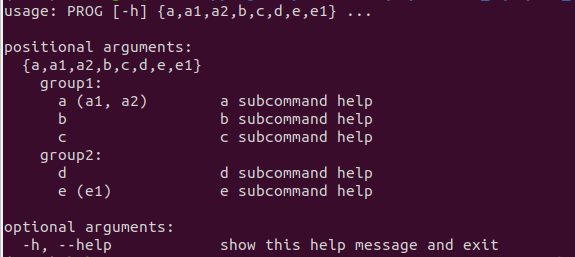
Which produces this nice command line output:

...$ python test.py
usage: PROG [-h] {a,a1,a2,b,c,d,e,e1} ...

positional arguments:
  {a,a1,a2,b,c,d,e,e1}
    group1:
      a (a1, a2)        a subcommand help
      b                 b subcommand help
      c                 c subcommand help
    group2:
      d                 d subcommand help
      e (e1)            e subcommand help

optional arguments:
  -h, --help            show this help message and exit

Note: There is a warning that this code may not work with parents argument of ArgumentParser, but I can live with that.

Mosquitto SSL/TLS Error SSL routines:ssl3_get_record:wrong version number

Mosquitto SSL/TLS Error SSL routines:ssl3_get_record:wrong version number

Up front, I will admit that I ran into this error because I did not read the documentation fully. However, in my defense, I feel like the error reporting could be clearer and the imprecise error message caused me to waste a bunch of time looking in the wrong place. Hopefully, this will prevent someone else from wasting their time as well.

Using an SSL/TLS Connection with Mosquitto MQTT

This is not a post about how to setup SSL/TLS on a Mosquitto broker. That has been well covered. Personally I followed the Mosquitto docs for instructions generating the necessary certificates and keys. Since I am using the Home Assistant Mosquitto Add-On I followed it’s instructions for configuring the Mosquitto Broker.

However, when I tried to connect using the mosquitto_sub command line tool, all I got was this:

 Client mosq-WzCVS53wMuaPbU8oNT sending CONNECT
 Client mosq-WzCVS53wMuaPbU8oNT sending CONNECT
 Client mosq-WzCVS53wMuaPbU8oNT sending CONNECT

When I checked the logs of the Mosquitto broker, all I saw was this error

Client connection from XXX.XXX.XXX.XXX failed: error:1408F10B:SSL routines:ssl3_get_record:wrong version number.

So I spent an hour trying different tls_versions and ciphers with no luck.

You must Specify a cafile or capath to Enable Encryption

It is that easy. If you specify the correct --cafile or a --capath in your mosquitto_sub command, things should work.

I would have expected a better error message from the broker or the client. I also was under the impression that using the --insecure flag would have allowed testing without the --cafile. I was wrong.

Of course, in hindsight the documentation clearly notes this requirement.

mosquitto_sub man page excerpt.
Yup, that is pretty clear.

Generate High Quality Cloud Map for XPlanet

Generate High Quality Cloud Map for XPlanet

I have really enjoyed my world map with realtime clouds. I use it as the background on my phone (updated hourly) and as the desktop on many of my computers as well.

However, my initial instructions relied on a rather low resolution version of the cloud maps. Luckily I found the CreateCloudMap python library from @jmozmoz that uses images from the Dundee Receiving Station. The whole process is quite interesting. The ingested images are full disk images of the cloud cover taken from 6 different geostationary weather satellites. Those images are then projected onto a sphere, stiched together, and then projected back out as a Mercator projection.

The resulting cloud map can be updated every three hours (limited by the image time periods offered by Dundee). The cloud map is perfect and is much higher resolution than the prior version.

You do have to sign up for an account with Dundee, but it is free.

Update: This is a good description of how the library works.

World Sunlight Map with Real Cloud Data and Accurate Seasons

World Sunlight Map with Real Cloud Data and Accurate Seasons

earth For a long time I have used an image similar to this one as the background on my phone.  The image accurately represents the current cloud formations and sunlight regions on the planet.  I came up with the idea from the following page: http://www.die.net/earth/.  There is a good explanation on how to do this at http://www.die.net/earth/how.html, so I won’t repeat it here.

If you want to purchase an expensive wall hanging version of this map amazon will sell you one for $3000+, Boardroom Sunlight Map.  Although it seems to me that you could purchase a Flat Screen TV and a Raspberry Pi and save yourself $3000, but hey, that is just me.

For a few years, I have used a Tasker profile on my Android phone to download a copy of this image once an hour.  Tasker then updated the background on my phone.  I find the image to be both beautiful and at least marginally functional.  Plus I enjoy the nerdiness of it.

A few months back I switched to a Nexus 4 and discovered that the image available from die.net was lower resolution that my phone.  This gave my the impetus to “roll my own” customized version.

I doing so I discovered the beautiful series of Blue Marble images that NASA has made available.  The The Blue Marble: Land Surface, Ocean Color and Sea Ice image was by far my favorite, but I noticed that NASA has since added monthly images that more accurately represent the snow pack and foliage for each month of the year.  Unfortunately, these images seem darker, and less vibrant than my favorite image.  Specifically, the greens and browns of the land masses looked very dull.  Additionally, the ocean was much more black and devoid of any character.

Luckily NASA aligns the images very precisely.  I first downloaded each monthly image and tweaked it in darktable.  I increased the exposure value to make them brighter, and increased the color saturation of the greens, browns and oranges.  The resulting images were much more vibrant.  Then to fix the ocean, I simply placed my favorite image into Gimp and overlayed the new images with a mask for the ocean over them.  The results were spectacular.

Then I simply added 12 different config files for xplanet and made 12 different cron jobs depending on the month.  Now I have my own custom World Sunlight Map with more accurate seasonal representation of the land mass.

A Temperature Controlled Whole House Fan with MisterHouse

A Temperature Controlled Whole House Fan with MisterHouse

MisterHouse Web Interface for a Temperature Controlled Whole House FanThe main feature of MisterHouse that sets it apart from other home automation systems is the ability to customize practically every aspect of the system.  The following example is a perfect demonstration of this.

I recently purchased a whole house fan, basically a giant fan that sucks hot air out from the highest point in my house. They are great if you live in a climate with cool nights.

The controls for my fan were very basic, an on/off switch and a two-speed setting.

With Misterhouse, I created an “auto” mode which will only turn on the fan if both the indoor temperature is above a defined threshold and the outdoor temperature is 5 degrees below the indoor temperature.

This is how I did it.

Starting Materials
– A Whole House Fan
– 2 IOLincs, (1 for on/off, 1 for fan speed)
– A MisterHouse enabled indoor temperature sensor (I used my Insteon Thermostat)
– A MisterHouse enabled outdoor temperature sensor (I used data from a neighbor’s weather station through weatherunderground)

I created the following items in my mht file:

GENERIC, house_fan, HVAC|WHF_Group
GENERIC, house_fan_temp, HVAC|WHF_Group
GENERIC, house_fan_setpoint, HVAC|WHF_Group
GENERIC, house_fan_ambient, HVAC|WHF_Group
INSTEON_IOLINC, DE.AD.BE:01, whf_main, HVAC
INSTEON_IOLINC, DE.AD.BE:01, whf_speed, HVAC

I also had the following items already setup:

$upstairs_thermo_temp #the temperature upstairs
$w_temp #the outside temperature

First, I set the available states for my generic objects:

$house_fan->set_states('on', 'off', 'auto');
$house_fan_speed->set_states('high', 'low');
$house_fan_temp->set_states('cooler', 'warmer');

Then I tied my generic items to my Insteon Devices:

$house_fan->tie_event('$whf_main->set("on")', "on");
$house_fan->tie_event('$whf_main->set("off")', "off");
$house_fan_speed->tie_event('$whf_speed->set("on")', "high");
$house_fan_speed->tie_event('$whf_speed->set("off")', "low");

Then I tied my Generic temp item to my Generic setpoint item, and inserted some custom code:

$house_fan_temp->tie_event('house_fan_temp_change($state)');
sub house_fan_temp_change {
	my ($state) = @_;
	if ($state eq "warmer"){
		$house_fan_setpoint->set(int($house_fan_setpoint->state) + 1);
	} elsif ($state eq "cooler") {
		$house_fan_setpoint->set(int($house_fan_setpoint->state) - 1);
	}
}

By doing this, I can have a nice cooler and warmer button in the web panel.

Finally, every minute I check to see if the device is in “auto” mode and whether or not it should turn on:

if ($New_Minute){ 
	if($house_fan->state eq 'auto') {
		if (int($upstairs_thermo_temp->state) > int($house_fan_setpoint->state) &&
		(int($upstairs_thermo_temp->state) - 5) > int($w_temp->state)) {
			if ($whf_main->state eq 'off') {
				::print_log("[a1housefan.pl] Auto: Turning on fan");
				$whf_main->set("on");
			}
		} else {
			if ($whf_main->state eq 'on'){
				::print_log("[a1housefan.pl] Auto: Turning off fan");
				$whf_main->set("off");
			}
		}
	}
}

The result, is a temperature controlled whole house fan.  The image above is a screen shot from my web interface.