Browsed by
Author: Kevin R Keegan

Python Argparse: Group Sub-Parsers

Python Argparse: Group Sub-Parsers

Python argparse has become a staple package in python in part due to its ease of use.

However, I recently came across an issue while using it on InsteonMQTT which makes extensive use of sub-parsers. Other than sorting, there is no mechanism to organize sub-parser objects to make them more readable.

This seems like a known issue going back to at least 2009 with no indication that it will be solved. Luckily, Steven Bethard was nice enough to propose a patch for argparse that I was able to convert to a module extension very easily.

In short, the following is the module extension argparse_ext.py:

#===========================================================================
#
# Extend Argparse to Enable Sub-Parser Groups
#
# Based on this very old issue: https://bugs.python.org/issue9341
#
# Adds the method `add_parser_group()` to the sub-parser class.
# This adds a group heading to the sub-parser list, just like the
# `add_argument_group()` method.
#
# NOTE: As noted on the issue page, this probably won't work with [parents].
# see http://bugs.python.org/issue16807
#
#===========================================================================
# Pylint doesn't like us access protected items like this
#pylint:disable=protected-access,abstract-method
import argparse


class _SubParsersAction(argparse._SubParsersAction):

    class _PseudoGroup(argparse.Action):

        def __init__(self, container, title):
            sup = super(_SubParsersAction._PseudoGroup, self)
            sup.__init__(option_strings=[], dest=title)
            self.container = container
            self._choices_actions = []

        def add_parser(self, name, **kwargs):
            # add the parser to the main Action, but move the pseudo action
            # in the group's own list
            parser = self.container.add_parser(name, **kwargs)
            choice_action = self.container._choices_actions.pop()
            self._choices_actions.append(choice_action)
            return parser

        def _get_subactions(self):
            return self._choices_actions

        def add_parser_group(self, title):
            # the formatter can handle recursive subgroups
            grp = _SubParsersAction._PseudoGroup(self, title)
            self._choices_actions.append(grp)
            return grp

    def add_parser_group(self, title):
        #
        grp = _SubParsersAction._PseudoGroup(self, title)
        self._choices_actions.append(grp)
        return grp


class ArgumentParser(argparse.ArgumentParser):
    def __init__(self, *args, **kwargs):
        super().__init__(*args, **kwargs)
        self.register('action', 'parsers', _SubParsersAction)

And the following is a simple test file test.py:

import argparse_ext


parser = argparse_ext.ArgumentParser(prog='PROG')
cmd = parser.add_subparsers(dest='cmd')
grp1 = cmd.add_parser_group('group1:')
grp1.add_parser('a', help='a subcommand help', aliases=['a1','a2'])
grp1.add_parser('b', help='b subcommand help')
grp1.add_parser('c', help='c subcommand help')
grp2 = cmd.add_parser_group('group2:')
grp2.add_parser('d', help='d subcommand help')
grp2.add_parser('e', help='e subcommand help', aliases=['e1'])

parser.print_help()

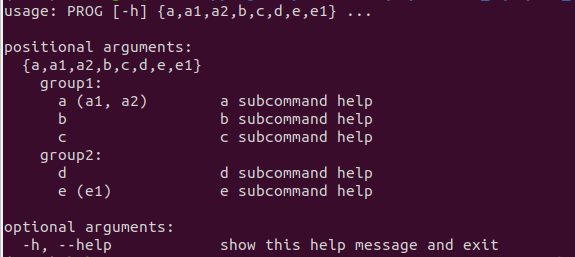
Which produces this nice command line output:

...$ python test.py
usage: PROG [-h] {a,a1,a2,b,c,d,e,e1} ...

positional arguments:
  {a,a1,a2,b,c,d,e,e1}
    group1:
      a (a1, a2)        a subcommand help
      b                 b subcommand help
      c                 c subcommand help
    group2:
      d                 d subcommand help
      e (e1)            e subcommand help

optional arguments:
  -h, --help            show this help message and exit

Note: There is a warning that this code may not work with parents argument of ArgumentParser, but I can live with that.

Marlin Unified Bed Leveling Tips

Marlin Unified Bed Leveling Tips

I am by no means an expert on 3D Printing. If you are looking for someone who is, I highly recommend Michael at Teaching Tech.

However, I did learn a few things while trying to level the bed of my Creality CR10 V2. I chose to use the Unified Bed Leveling system in Marlin. You should read up on it on the Marlin site.

Here are the few things I learned that I didn’t see mentioned anywhere else.

Choose Measurement Points to Maximize Sensor Reach

For most setups, the bed leveling sensor cannot reach the entire bed because the sensor is offset from the print head. For the CR10 with a BLTouch, the sensor is offset about 46mm on the X axis. Since the printer head limit on the x axis is 0, this means that the sensor cannot reach any point less than 46mm on the x axis.

I want to maximize the portion of my bed that is measured, so I chose Marlin settings that would generate a measurement grid with an x-column as close to 46mm without going below that limit.

The formula for determining the locations of the measurement points is:

X point = UBL_MESH_INSET + Xpt((X_BED_SIZE – 2 x UBL_MESH_INSET) / (GRID_MAX_POINTS_X – 1))

Y point = UBL_MESH_INSET + Ypt((Y_BED_SIZE – 2 x UBL_MESH_INSET) / (GRID_MAX_POINTS_Y – 1))

Where Xpt and Ypt are the indexes of the X and Y points from 0 to (GRID_MAX_POINTS_[XY] – 1).

In my case UBL_MESH_INSET = 10 X_BED_SIZE = 310 GRID_MAX_POINTS_X = 9 Y_BED_SIZE = 310 GRID_MAX_POINTS_Y = 9

So in my case, the X position of the second column of measurement points is: 10 + 1((310 – 2 x 10) / (9 – 1)) = 46.25. This is conveniently just slighly higher than my limit of 46mm, meaning I am measuring the bed as far left as I can and getting as much from my level sensor as possible.

Hope this helps.

* If you have altered less commonly used setting such as [XYZ]_MIN_POS, [XYZ]_MAX_POS, or MANUAL_[XYZ]_HOME_POS you made need to adjust this formula.

Defined Your Calibration Points to Match a Measured Point

This one seems like a no-brainer, and I am a little surprised that Marlin doesn’t do this by default.

The UBL system contains an option that can transform a mesh based on a 3 point measurement using command G29 J. You can read about how this all works on the Marlin site.

By default, Marlin defines the 3 measurement points as (X Min, Y Min), (X Max, Y Min), and (X Midpoint, Y Max). However, this can lead to larger errors if one or more of the calibration points does correspond to an existing measured points.

This error happens because the bed mesh outside of the measured points is an extrapolation, an educated guess. This extrapolation is not perfect, and the error in an extrapolated point will always be equal to or greater than the error at a measured point.

So, if any of your calibration points is an extrapolated point, then your error is greater than it needs to be.

This is an easy problem to solve, simply determine the three points on your measurement grid that create the largest triangle possible. Generally the three points are (XMin, YMin), (XMax, YMin), and (XMidpoint, YMax). You can calculate these points using the formulas in the sections above.

In my case these points are (10, 10), (290, 10), and (191.25, 290).

These can be defined in Configuration_adv.h as follows:

#if EITHER(AUTO_BED_LEVELING_3POINT, AUTO_BED_LEVELING_UBL)
  #define PROBE_PT_1_X 10
  #define PROBE_PT_1_Y 10
  #define PROBE_PT_2_X 290
  #define PROBE_PT_2_Y 10
  #define PROBE_PT_3_X 191.25
  #define PROBE_PT_3_Y 290
#endif

Do Not Edit the Calibration Points

UBL allows users to edit the measured points on their mesh. Whether to enter values that cannot be measured because they are outside the reach of the level sensor, or to correct for errors in the measurement.

However, it is important, not to alter the values of the 3 calibration points.

This is because, if you change these values, the next time you run a 3 point calibration, the measured values will be close to the original, but till no longer match the mesh. Marlin will attempt to tilt or translate the bed mesh to match this discrepancy, which will cause the mesh to be wrong.

So instead, check the bed at all 3 calibration points. If adjustments need to be made, change the NOZZLE_TO_PROBE_OFFSET or from the Marlin UI in “Configuration” -> “Probe Z Offset”. If the discrepancy between the three calibration points is not identical, you will have to select the best value.

Again, hope this helps. Contact me if you have questions.

Mosquitto SSL/TLS Error SSL routines:ssl3_get_record:wrong version number

Mosquitto SSL/TLS Error SSL routines:ssl3_get_record:wrong version number

Up front, I will admit that I ran into this error because I did not read the documentation fully. However, in my defense, I feel like the error reporting could be clearer and the imprecise error message caused me to waste a bunch of time looking in the wrong place. Hopefully, this will prevent someone else from wasting their time as well.

Using an SSL/TLS Connection with Mosquitto MQTT

This is not a post about how to setup SSL/TLS on a Mosquitto broker. That has been well covered. Personally I followed the Mosquitto docs for instructions generating the necessary certificates and keys. Since I am using the Home Assistant Mosquitto Add-On I followed it’s instructions for configuring the Mosquitto Broker.

However, when I tried to connect using the mosquitto_sub command line tool, all I got was this:

 Client mosq-WzCVS53wMuaPbU8oNT sending CONNECT
 Client mosq-WzCVS53wMuaPbU8oNT sending CONNECT
 Client mosq-WzCVS53wMuaPbU8oNT sending CONNECT

When I checked the logs of the Mosquitto broker, all I saw was this error

Client connection from XXX.XXX.XXX.XXX failed: error:1408F10B:SSL routines:ssl3_get_record:wrong version number.

So I spent an hour trying different tls_versions and ciphers with no luck.

You must Specify a cafile or capath to Enable Encryption

It is that easy. If you specify the correct --cafile or a --capath in your mosquitto_sub command, things should work.

I would have expected a better error message from the broker or the client. I also was under the impression that using the --insecure flag would have allowed testing without the --cafile. I was wrong.

Of course, in hindsight the documentation clearly notes this requirement.

mosquitto_sub man page excerpt.
Yup, that is pretty clear.

Insteon is Great; The User Experience is Awful

Insteon is Great; The User Experience is Awful

I own more than 75 Insteon products. I also own numerous other “smart” devices from other manufacturers.  In all I have video doorbells, smart smoke detectors, controlled door locks, weather stations, electronic blinds, smart light switches in every room, smart outlets, and a sophisticated automation hub to link all of this together.

Beyond that, I have been involved in open source programming for home automation for a number of years.  I have contributed extensively to Misterhouse, written some of my own Insteon software, and most recently started contributing to an Insteon-MQTT project for Home Assistant.  Over the years I have spent hours digging into and deciphering the Insteon messaging protocol and solved some very complex problems.

In short, I should be the target audience for anything related to home automation/ internet of things (“IOT”).  Given my work and usage of the products I speak also with some authority about issues related to Insteon.

With that out of the way, it is my opinion that historically Insteon products are good (not great) and that the Insteon user experience is awful.

This opinion is formed from years of irritation with Insteon and Smart Labs, but my recent experience with the Insteon Hub is the impetus for this entry.

Insteon Hardware

Insteon hardware has had its issues, many of them fail to last largely due to electronics issues.

  • 2008 – Cheap tactile switches were used in Insteon products causing what seems like all of the devices to stop working.  As the sad owner of many of these devices this was very irritating.
  • Constant – Bad capacitors used in PLMs this has been a problem at least as far back as 2014 and appears to continue today. I recently had to have a PLM replaced due to this issue.
  • Currently – Possibly more bad capacitors used in Hubs I honestly don’t know why power supply capacitors continue to be an issue.  Again, I also have suffered through this failure.

That said, in generally I find the hardware to be largely acceptable, as long as it doesn’t break.  The prices are reasonable, the appearance is generally acceptable, and the mechanical components stand up to a fair amount of use without breaking.

If the electronics were more robust I would fully endorse the hardware.

Insteon Software

Sadly things go dramatically downhill on the software side.  I won’t get into the poor choices buried deep inside the Insteon protocol (ahem, not a stateless protocol), but needless to say there are many.  I also won’t go into detail about the poor and inaccurate documentation.  While these things are bad and should have never happened, these are only problems that developers see.

However, Smart Labs and Insteon have continually released poor consumer facing software.  For example HouseLinc, is a windows automation app offered by Insteon.  It looks like something written for Windows 95 (indeed it supports XP through Win 7).  Even ignoring that, it had extremely limited functionality and offers no web based or mobile phone control.

The current Insteon Hub is no better. In the 5 years since its release. Insteon has release two separate mobile applications for it App One and App Two. Neither app is very user friendly. As I noted above, some of the Hubs died prematurely. When this happened, there was no way for a user to migrate to a new hub, or even to sign into their account to add a new Hub! The only option was to use a different email address to create a new account, or call Insteon and ask them to do some magic.

Insteon is Hostile to Developers, or at least Apathetic

Years ago, Insteon had a paywall for developers. It was something like pay a $200 one time fee and they would give you access to their developer documents for their devices. The sad thing, was that these documents were poorly written, often failed to disclose all of the features, rarely updated, and contained numerous errors.

Luckily, by using various tricks, many of us have been able to “sniff” the Insteon traffic and have reverse engineered support for features through a lot of hard work.

Today, Insteon claims to accept developer applications, but I have never heard of anyone hearing back from them.

I suspect that the makers of the ISY products have developer access and possibly a contact at Insteon that will answer their questions. Of course, ISY sells its products through Insteon and SmartHome. I suppose it is possible that Insteon is reluctant to help any other developers as a favor to ISY.

I am Still an Insteon Advocate

Given all of my complaints, you should rightly expect that I would have abandoned Insteon years ago.

But I still believe that fundamentally, their products are some of the best home automation products you can buy.

Why?

  1. The products do not require or use any cloud based service.*
    • This means there are no outages.
    • Insteon devices will continue to work even if the company goes out of business. This isn’t true for other protocols.
  2. The products use both radio frequency and power line communications.
    • Given a decent sized network, they tend to suffer from less communication issues than competing products.
  3. They do not use wifi!
    • The joke as long been that the “S” in IOT stands for security.
    • Keeping my devices off of the network makes them a much less tempting target for hacking.
  4. The products generally look nice and work well.
    • Honestly, this should be your main concern when buying any home automation products.
  5. The protocol had remained consistent for 20+ years.
    • Devices purchased 20 years ago are still compatible with devices purchased today.

* The Insteon Hub does have a cloud component, and can suffer at least partial outages in the app. But my understanding is that even when the cloud is down, local control using the hub still continues to work.

What Insteon Needs to do Going Forward

  1. Embrace Developers!
    • The Home Automation community is dominated by Makers and Hobbyists.
    • Sure, some users only want their Google Home Device to be able to turn on their lights. But in my experience, once a user does this, the majority of them start looking for more complex home automation systems.
  2. Stop trying to be Google.
    • By this I mean, embrace your local control. Forget or at least minimize the cloud.
    • You can sell this as a privacy and security feature, because it is!
  3. Fix your software!
    • The user experience is critical.
    • You have to get the basics to work smoothly first.
    • If that means you have to temporary abandon some cloud features, then do it.
    • If you do step 1, the community will make a great user experience for you.

These are my initial thoughts. I will try to revisit this post as I more thoughts come to me.

New Free Source for XPlanet Cloud Map

New Free Source for XPlanet Cloud Map

Sadly the Dundee Receiving Station is gone.

They announced over a year ago that their funding had not been renewed and sadly it looks like it has come to an end. For many of us Dundee was the source for geostationary cloud images of the earth that we have used to generate World Maps with Realtime Cloud Data:

Realtime Clouds – but with some stitching artifacts near the polls.

In searching for a new source I discovered the RealEarth project by the Space Science and Engineering Center (SSEC) at the University of Wisconsin-Madison. It is fantastic! This project provides for a nice well defined API to access image tiles of the earth, including cloud maps updated hourly. These image tiles are already in equirectangular projection, so their is no need to align and map them onto a sphere.

Once you download all of the image tiles and stitch them together the resulting image is higher resolution, with no discernible artifacts, and updated 3x more frequently than using the Dundee images the CreateCloudMap.

Using the highest resolution imagery, it does require downloading 512 image tiles. However, as I said, their API is fantastic and I was able to throw together a very simple python script that automates the downloading and stitching. The script outputs a single 8192×4096 cloud map. Here is a sample:

Now Higher Resolution and With Fewer Stitching Artifacts!

As you can see, this has much fewer stitching artifacts. It also relies on more satellites to get even better detail. The resulting World Map is the first image in this article.

Getting the full size image does require signing up for an API key if you want to download the image once per hour. Otherwise you will exceed the non-API data cap. If you are satisfied with a 4096×2048 image, you can download this once per hour without exceeding the cap for non-API users.

The python script for generating hourly cloud maps for xplanet is here. It is open source, so feel free to contribute.

A Note About a Paid Source for Cloudmaps

I am aware that xPlanet redirects its users to a paid source for obtaining cloud maps. I won’t link to the service here because I find them to be unethical. I understand that hosting and bandwidth cost money, but this service charges $100 per year for access to the same free cloud maps you can obtain yourself.

The resolution they offer is the same, and the frequency is the same. They are taking a free product, hosting it on their web server and charging you $100 for it. This is unjustifiable robbery. I also find it a bit icky that an open source project is redirecting its users to a paid resource that is so patently a money grab.

Thank You Jmozmoz for Cloudmap

The Create Cloud Map Library by @jmozmoz was awesome. You can read more about how it worked here. Sadly with the end of Dundee and RealEarth providing an already projected image, there is no longer a need for the library. It was however a great tool for many years. I learned a lot about how coordinate systems work while tinkering with it.

Thank you.